
To see if this custom-fit item will work for you please tell us what vehicle you'll use it with.
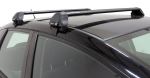
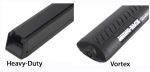
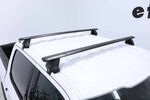
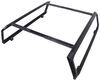
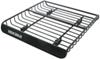
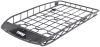
These heavy-duty, aluminum crossbars work with Rhino-Rack legs to create a sturdy roof rack. The square bars include built-in C-channels for mounting Rhino-Rack heavy-duty, contractor-grade accessories.
Features:
Rhino-Rack HD Crossbars - Black - Qty 2:Videos are provided as a guide only. Refer to manufacturer installation instructions and specs for complete information.
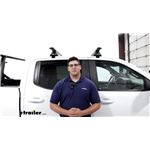
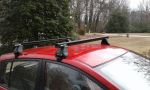
Hi, Matt with the etrailer. Today, we're gonna be talking about the Rhino-Rack Roof System with the Aero Bars on our 2021 Chevrolet Silverado 1500. In most cases, I'd recommend someone get a ladder rack as opposed to a roof rack, but your circumstance might differ. Maybe you're trying to be a little bit more economic or maybe you just don't wanna deal with getting around the ladder rack in the back of your bed, maybe it's just kind of in the way. Or maybe you want to use it in conjunction with your ladder rack and roof rack. So maybe you have those larger items that stick out pretty far, and you need multiple points to secure your items up top with.
Our roof rack's gonna be composed of three components. The first component is gonna be our crossbars up top. Then we're gonna have our Rhino-Rack Towers, and then we're gonna have our fit kit that fits directly to our vehicle. The crossbars are gonna be our Aero Vortex Crossbars, and they're gonna be 65 inches long. They're gonna have two channels built into them.
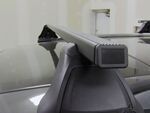
The top channel is gonna have this weather strip, and that's gonna help prevent any wind noise and keep debris from going into that channel. This channel on the bottom is just gonna help you fit your towers in place. We're also gonna have these plastic endcaps. They're gonna have these built-in locks just to keep 'em secure so then we can take 'em off. But if you want something a little bit more sturdy and more secure, you can go to our website and replace these with metal endcaps.
This shape of our bar is gonna help it be more aerodynamic and also help prevent on wind noise. The next piece is gonna be our Rhino-Rack Tower and it's gonna sit into our crossbar using a block that fits right into the T-channel. And we're also gonna have this plate on the back with this locking core, so it's gonna add additional security so no one can come by and take this off. And your towers are gonna sit right on top of your fit kit and it's gonna be composed of this pad with this clip on the end that sits right under your door. Our crossbar is gonna have a weight capacity of 165 pounds.
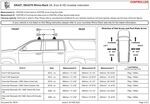
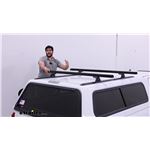
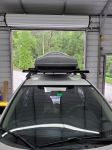
Now keep in mind to keep track of what your roof is capable of handling, 'cause the bars may be able to handle 165 pounds, but your roof may not. It's also gonna be able to accept T-track accessories. And how you access that is you just need to pull this weather strip and just cut off whatever you need, and you'll be able to plug in those accessories up top. We're also gonna have the ability to accept clamp-on accessories, and they're just gonna sit right on top and clamp around our crossbars and sit just like that. As for having 'em to sit on our vehicle, they're gonna be pretty flush with our vehicle. I'd actually recommend if you want more space, you could even go up a size up. And as for how it's gonna sit up top, we're gonna have from the top of our roof to the top of our crossbar just about 5 1/2 inches. So always just keep in mind when you are putting things up top, you count what the total height of your system is. So you need to count how high your vehicle is, your crossbar, and whatever accessories you have up top. Overall, this is gonna be a pretty solid system, especially if you are using it in conjunction with any of your ladder racks. Now installing it was a little bit of a hassle, because if you wanna tighten things down, these crossbars down, when you're putting up your towers, it can be a little bit tricky to get underneath there. But if you need a hand on how to do that, just stay tuned and we'll show you how to do it. To start off our installation, we're gonna lay everything out. So we're gonna have our Vortex Aero Bars and we're gonna have our towers. This is how it's gonna look like without the bases installed, and this is how it's gonna look like with the bases installed. We're also gonna have the hardware for it, and our bases, and the included tools, the one key for the crossbars, and the key for our locking cores for our towers. Along with that, we're gonna have an Allen key. I also recommend getting a smaller Allen key that's the same size just so it's a little bit easier to tighten things down with the crossbars up top, and a measuring tape to help measure everything out. I'm gonna start off by getting our bases prepared, and we just need to make sure it's in the right orientation. To do that, I'm just gonna flip this over, and you'll notice we have this arrow pointing forward. When you install this, you're gonna want that to point to the front of your vehicle. We're also gonna have this M699 labeled on here, and what that's gonna mean is the ones with this label are gonna install on your driver's side. The ones with the M700 are gonna be installed on your passenger side. And for this piece here, we want this arrow to point away from the interior of our vehicle. So this piece is gonna go on our rear driver's side. And how you install this together is you just place this on top, line up those holes, and push down. You might hear or feel a click when it's fully attached. And when it is fully attached, this is what it's gonna look like. Next up, I'm gonna prepare my tower. All I have to do for that is grab our key and just unlock the back of this so I have access to the interior of it. And then, I'm gonna just grab this clamp, and I'm gonna line up that hole with this hole inside of it, and just bolt in this bolt. I'm just gonna lightly screw that in just enough with it to grab onto the other side, 'cause we want this to be pretty loose so we can adjust it further. That's pretty good there. And next up, I'm just gonna grab that base from earlier, making sure that arrow is pointing away. And I'm gonna line up these two spots here with these two hooks here. And I'm just gonna clamp that on together so it's attached like this. And now I can install it to the top of my roof. When installing your towers on top of your roof, I actually find it a little bit easier to install 'em on your crossbar first. So just make sure you do the same thing on this tower that you did on this tower. We're just gonna come over to our crossbar and use our crossbar key to unlock the very end of it, just removing that endcap and removing it. I'm just gonna place that on the side. Next up, I'm gonna flip over our crossbar so we have a little bit of a better time attaching our towers to it. And I'm gonna grab this tower, make sure I got plenty of room to slide this block through this channel. So I'm just gonna line that up, and just push over on it. You might have to adjust it just a little bit to fit in there right. Once you have it there, I'd recommend just leaving it loose for the time being, and put your endcap back on. You might have to adjust it a little bit or flip it over. And lock it down. And then, we can do the same thing on the other side. After we have both of them installed, in our case, we've already installed our front crossbars and taken that measurement, and now we can apply it to this one. Now it might kind of differ depending on what type of cab style you have, so just kinda make sure you get those measurements. And once you have it as close as possible, you can tighten everything down, about to use our included tool. And when I tighten it down, I'm not gonna tighten it fully down. I just wanna tighten enough where it's gonna stay in place. But if I ever need to adjust it, I can. So once you have that done, just do it on the other side. Next up, we're just gonna lift up our crossbar and put it up top. Sometimes you might need a friend, if you don't, you can try it yourself. But in our case today, I'm gonna have Aiden assist us with this. So all I'm gonna do is lift up, and reach over and hand him the other side, and just place it down on our roof. After, when you have it placed on your roof, then you can start adjusting to see what fits your roof best. After, when you've made your adjustments to how this fits up top and your crossbar is spread, you can start tightening everything down. So what I like to start with is tightening the towers the rest of the way to our crossbar, and that's why I like to use this other Allen key, 'cause it's gonna be a lot easier to get underneath here and tightening it the rest of the way down. Finding it can be a little bit tricky, and you need to make sure you have a good hold on your crossbar so it doesn't slide around on top of your roof, 'cause we haven't tightened it down to the roof yet. And once you get that tightened the rest of the way, you do the same thing on the other side. The next spot we're gonna tighten is this bolt in the interior of our tower. So what that's gonna do is that's gonna help this clamp below secure to our vehicle. Once you get this tight enough and it's secured on one side, you can repeat this same process on the other side. Next up, I'm just gonna put on this locking plate, but before that, I always like to give it a good shake to make sure everything feels secured just so I don't have to take this back off if it doesn't feel secured. But it feels very secured, so I'm just gonna put these two tabs inside here first and place it on. Gonna adjust like that. It sits up there now and I just gotta lock it in place so it secures everything. And once you do that, you repeat that same process on the other side. And after we have all that installed, you can take it for a ride. That will conclude the install and some of the features of the Rhino-Rack Roof System on the 2021 Chevrolet Silverado 1500.
Average Customer Rating: 4.6 out of 5 stars (176 Customer Reviews)
These heavy-duty, aluminum crossbars work with Rhino-Rack legs to create a sturdy roof rack. The square bars include built-in C-channels for mounting Rhino-Rack heavy-duty, contractor-grade accessories.The roof rack continued to get loose and I lost 2 kayaks going down the highway. I was able to recover them after significant damage. The whole rear rack fell off. Once reinstalled I added numerous straps and continued to stop every 50-75 miles to retighten and adjust so it didn’t happen again. I will not be using these roof racks again.
I needed roof racks on my 2023 Silverado to accommodate the shape of my canoe. I had Yakima racks on the camper shell but the canoe was hitting the top of my truck. My Rhino racks showed up yesterday evening and I’m ready to go this morning!

The rack fit well and was easy to install. Seems to be made well. The problem is the amount of road noise. I never even put the basket on. It was so loud, it roared. I repositioned it several times but the noise was way too much and I finally just removed it. I spent a lot of money for the rack and the basket and now they are in storage. I wish it would have worked out better because I thought it looked really good.
The order was delivered yesterday, and I got it installed today. The product quality is very good and I am pleased with the fit and sturdiness. Installation went fine. I am slow and methodical with these types of installations. It took me a little less than 2 hours. Many people could do this in around an hour or so with no problems.
Awesome rack. Perfect fit and very sturdy. Love it!
Fits the truck perfectly and holds canoe tight. Feels very solid and trustworthy.
We originally got this rack system (Custom DK Fit Kit for 4 Rhino-Rack 2500 Series Roof Rack Legs - Naked Roof Item #DK427) mostly for our Kayak racks on our 2015 Ford F-150, which worked great. Then we totaled our F-150 and the racks actually fit on our new 2022 GMC Sierra 2500 HD P/U. We took it on a 16,000 mile trip from the East Coast to Alaska with both 12 ft. kayaks on the top. Through the various speeds (sometimes up to 80 mph), weather conditions, and the high crosswinds of the mid-West, the racks help up perfectly. No issues or problems. I would recommend these to anyone.
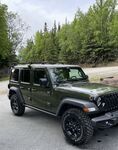
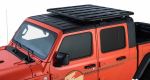
Ok… giving this item four stars as an overall view. The good: it fits a Jeep Wrangler perfectly. With the appropriate legs, it canvases across the entire roof of the Jeep with the legs attaching to the gutters. The bad: just a bit too noisy for my liking, even with the appropriate wind faring (I don’t expect absolute silence since I have a one touch sky top). The noise is not a big deal on short trips, but it was definitely driving my wife and kids nuts on a 2+ hour drive (stick some headphones on the kids, problem fixed)
In the future, I might switch it up from these square rails and go with something a bit more aerodynamic…
Easy install… heavy duty, look goid
Awesome company to do business with! 2nd set of Rhino racks I have purchased from them and it was a smooth transaction both times.
Fast shipping and correct products described on the website, I love ordering from etrailer.
Great packaging, timely delivery and good quality Rhino products! I watched a utube video on installing the rack system which made the install much easier.
Thick rack came on time as promised. I was notified when my rack was shipped and a link to to the carrier was attached Rack was easy to install and fit my truck perfectly. etrailer was a pleasure to do business with.
Great product sturdy bars. Keep in mind anything you install on the bars needs to have longer bolts because of how big the bars are but that's a minor detail
This rack works perfectly on my Nissan Versa for carrying my two Perception Sound 9'6" kayaks. The Rhino-Racks look good to me. The kayaks can rest directly on the rubber pads on the rails, unlike the Yakama racks I had in the past that had bare pipe rails. Also, I expect I can buy parts to adapt this product to a different car without having to buy new towers. I am sorry there are not hooks or loops to attach bungees when carrying lumber. They are noisy in the wind, but less so when carrying the kayaks.
Ordered a Rhino Rack for my 2014 GMC Sierra 2500HD Denali. Rack arrived in very good shape and all items were there. Installing at this time and see no problems ahead.
I have a 2020 Chevy HD crew cab. Fit perfect. Installation was easy.
I just finished the install of the Rhino Rack 2500 with the Vortex Bars. It looks fantastic on my 2020 Silverado. It's solid and very well built. I'm a surfcaster on Long Island and I use 1 piece fishing rods up to 11ft long so the easiest and best way to transport them is on top of my vehicle. I selected this rack because it's aerodynamic and with the accessory channel I was able to easily attach them by sliding a 1inch stainless bolt and stainless washer in the channel. This hides the attachment and makes it impossible to remove unless you have the keys to access my rod rack which has a padlock.
I've had Thule & Yakima products over the years, with no issues. But I'm really glad I ordered this set-up for my 2021 F-150. I think you get just as good of a product from Rhino, maybe even better, for a slightly lower price. Everything feels sturdy and well made (with the possible exception of the locking covers, which feel a bit flimsy). I really like this set-up, and the precise measurements and guides made for a perfect snug fit. The rubber strip running on the upper long edge of the bars feels like it will definately help keep accessories from sliding out of place.
Got it on sale, matches the color of my truck. Same as my roof rack for my former vehicle which is now on my wife's car, however this one actually fits my truck.
Ez to follow instructions and quick ins tallation.
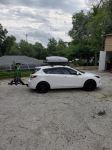
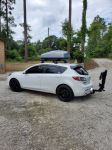
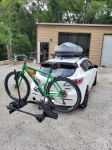
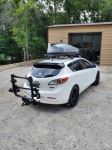
Thanks to Etrailer, I am ready to do some serious summer exploring with my 2013 Mazda 3! Rhino Racks, Malone top box, and Kuat bike rack!
Fits 2017+ Super Duty!
I had the vortex 2500 on my previous truck which I removed when I traded it in for the 2017 super duty. I knew all I needed was the foot kit to make the switch over to the new truck. But, for some reason Rhino rack didn’t have a kit for the new body super duty. They did however have kits for the 2015+ F150 which I knew would work because they share the same cab. My hunch was correct and the foot kit worked great.
The measurement for the spacing between the feet were a little off. The F150 calls for 169mm and 166mm between feet (front bar/rear bar). I found that to be a bit too narrow. I added about 5mm on each and it fit perfectly.
Great product, very well built, heavy duty. the assembly and settings instructions are easy to follow and when I placed it on the roof of my 2015 f150 super cab, it fit perfectly with no further adjustments necessary. I am very impressed with this Rhino Rack and feel it will probably outlast me and be handed down through many generations. Also purchasing from etrailer was an awesome experience, fast free shipping. easy website to navigate.
Good quality and locks are included. The plastic lock covers are flimsy but they will keep an honest person honest.


Do you have a question about this Roof Rack?
Info for this part was:
At etrailer.com we provide the best information available about the products we sell. We take the quality of our information seriously so that you can get the right part the first time. Let us know if anything is missing or if you have any questions.


Thank you! Your comment has been submitted successfully. You should be able to view your question/comment here within a few days.
Error submitting comment. Please try again momentarily.